Articles by "Android"
Showing posts with label Android. Show all posts
Print Friendly and PDF
Place where all sort of programming stuff and reviews,technology news are shared and Useful Project of C++,C,java C# etc

Running on over 80 percent of smartphones and tablets in the world, Google’s Android is the number one mobile operating system. The Android operating system is open and flexible, which makes it awesome — for users and developers alike — in so many ways. But the OS’s openness and flexibility also leave the system vulnerable to invasion by malware. Malware can be used to compromise the security and privacy of your Android device.

Protect android

In most cases, malware in Android smartphones and tablets appears in the form of an application. Sometimes, an app includes malicious codes that make it perform certain actions without your consent. For instance, some applications broadcast your location data when you are searching for local maps. But malware is not the only threat when it comes to the security and privacy of your Android device. The operating system is under constant attack and older versions are more vulnerable than new ones.

Is there something that Android users can do to secure their devices? Yes. Plenty, actually. In this article, we explore various ways you can protect your Android device from a wide range of threats out there. Read on to find out more.

Use VPN

VPN is short for Virtual Private Network. A VPN service encrypts your internet connection and is arguably the best privacy tool for securing your Android device when you are connected to the internet. creates a virtual network of any number of connected devices online thus concealing the IP addresses of devices on the network. Android VPNs optimized for the OS are rapidly growing in popularity among Android users.

Since the internet has become such a huge part of our lives, we need to ensure that we are fully protected when we go online. Android VPN is one of the best ways to protect yourself from hackers and snoopers as you go about your business online. If you frequent online shopping sites such as Amazon, you can enjoy the perks of using a VPN to shop online without having to worry about someone stealing your credit card information and other personal data.

Enable Two-Factor Authentication

Two-factor authentication may seem like an inconvenience but it’s one of the most effective ways to lock down your Google services. 2-FA requires you to verify with a unique verification code and a passcode sent via OTP every time you log in to your Google account. To enable two-factor authentication, log in to your account, go to settings, and click on ‘Using 2-step verification.’ When 2-FA is enabled, no one can access your account even if your password is hacked.

Only Install Apps from Trusted Sources

The Android operating system allows users to install apps from third-party app banks through a process known as sideloading. To be able to install applications from third-party platforms, users are required to enable ‘Install apps from Unknown Sources’ in device settings. This is not recommended. Apps downloaded from third-party app banks may contain malware. Always disable the installation of apps from unknown sources to be on the safer side. Go to Settings > Security to make sure that this feature is disabled.

Install Anti-Virus Software

The latest versions of the Android operating system do a pretty good job when it comes to securing your smartphone or tablet. However, experts maintain that it’s not enough and users ought to do more to protect their data. Just like your computer, your Android device is also susceptible to data theft. Installing antivirus software and other security apps can be useful. Popular choices include Kaspersky, Avast, Norton, McAfee, and Bitdefender. Look for features such as Automatic Scan, Malware Detection, Anti-Theft, etc.

When it comes to device security, you can never be completely safe. This is especially true for Android-powered smartphones. Hackers are constantly coming up with creative ways to compromise the security of your device and steal data. However, by following these suggestions, you can make your Android smartphone more secure.

Place where all sort of programming stuff and reviews,technology news are shared and Useful Project of C++,C,java C# etc
Group Messenger is an online multi-chat communication application developed with the aim of creating a platform for closed group chat room. Using this application, same message can be sent to a large number of users who have joined the chat room.
Android Group Messenger
Since only the verified group member can send and receive the message, Android based Group Messenger can be considered as safe and secured mean of information sharing.The source code of this app project is simple, bug-free and user-friendly.

Note:
 You can download the source code and other necessary project files from the download link Here
Place where all sort of programming stuff and reviews,technology news are shared and Useful Project of C++,C,java C# etc
Class Timetable is an Android application developed with the purpose of helping the educational institutes to plan, schedule and maintain regular classes following a specific time schedule. The application aims at notifying faculty members about their class timing and planning of classes. 
 Android Class Timetable
Using this class timetable app, a user can check the list of available batches and timings and doesn’t need to visit or make calls to his working institute for getting updated with his classes. The source code of this project is complete and error-free. 
Note:
You can download the source code and other necessary project files of Android based Class Timetable app from the download link Here
Place where all sort of programming stuff and reviews,technology news are shared and Useful Project of C++,C,java C# etc
Block Call is an android app developed for the purpose of blocking unwanted incoming calls. It mainly focuses at rejecting specific partial caller IDs as incoming calls.
 Android Block Call
The application promotes the use of voice mail or sms rather than making calls. Block Call applications are mostly used by politicians, businessmen, brokers, criminals, etc.

Note:
 You can access the complete source code and project files of this android app project from the download links Here
Place where all sort of programming stuff and reviews,technology news are shared and Useful Project of C++,C,java C# etc
This Calculator app is an application developed for android cells phones and tablets. It enables the users to perform fundamental mathematical operations such as addition, subtraction, multiplication and division on their phone. Being installed on phone, it always remains with the user, helps in daily life calculations and works as a typical android calculator app.

Android Calculator AppNote

 You can download the source code and project files from the download link Here
Place where all sort of programming stuff and reviews,technology news are shared and Useful Project of C++,C,java C# etc
Text to Speech Converter is an application developed for Android cellphones and tablets. It mainly focuses at conversion of written text to speech in any given language.
text to speech 
Using this app, most of modern android cellphones can feature the facility of reading text messages so that user doesn’t need to go through the message. Moreover, the application can be used to learn pronunciation of words or lines of text.
Note:

 The complete source code (code of android XML file and android JAVA code) of this project download Here


Place where all sort of programming stuff and reviews,technology news are shared and Useful Project of C++,C,java C# etc
Bluetooth Activation is an application designed to enable or disable Bluetooth in android devices. With simple coding, this app can activate Bluetooth with or without user’s permission. Using this Bluetooth service, both Android cellphones and tablets can share the data without physical connection of devices, or use Bluetooth as a means of playing game, instant messaging, wireless headphone, and many more.
Android Bluetooth Activation


I have briefly introduced the features and scope of Bluetooth enable/disable Android app. Carefully follow the steps given to test this project. 


Note:
Complete  documentation of  Bluetooth Android app can be accessed from the download link Here
Place where all sort of programming stuff and reviews,technology news are shared and Useful Project of C++,C,java C# etc
WiFi Activation is an app built for Android cellphones and tablets. This project mainly focus  on enabling and disabling WiFi using simple source code files. Using this app, the WiFi activation procedure of android device is improved and WiFi activation app can
Android WiFi Activation
remove undesirable wireless connections. This app is very easy to download, setup and run.

I  introduced the scopes and features of WiFi Activation Android app as a reference project abstract. The source code files containing code of Android XML file, code of Android Java file and code of Android Manifest.XML 

Note:
File can be accessed from the download link Here
Place where all sort of programming stuff and reviews,technology news are shared and Useful Project of C++,C,java C# etc
Unit Converter is an android application developed for cell phones and android tablets. This app is for the conversion of one unit of physical quantity to anther equivalent unit; for example: conversion from degree Celsius to Kelvin or other equivalent units.
Android Unit Converter
Using this Unit Converter application, occurrence of error in unit conversion can be rooted out. The application establishes an easy and effective platform for unit conversion in Android devices.The source code of this application is easy to understand and completely bug free

Note:
You can download the source code Here
Place where all sort of programming stuff and reviews,technology news are shared and Useful Project of C++,C,java C# etc
Age Calculator is an android app developed for the purpose of calculating exact age of user. The app woks on any android devices fulfilling the basic requirement of app. It mainly focuses at determination of exact age of user depending upon the input date of birth. Use of application diminishes the manual age calculation procedure and roots out the error in age calculation in android phones.
Android Age Calculator


I have briefly introduced the growing scope and feature of Age Calculator app.   This source code to develop  android app or as your semester project. 

Note:
Download here

Place where all sort of programming stuff and reviews,technology news are shared and Useful Project of C++,C,java C# etc
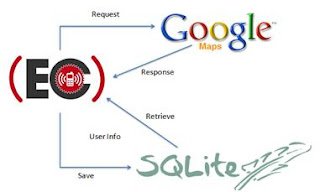
E Contact is an application developed in Android platform to help the app users in emergency situations. This Android based E Contact app can be used as a mobile app to contact different departments such as hospital, fire station, blood bank, police, ambulance and other emergency contacts.
Android E-Contact System
Even people with speech disorders can use this application to communicate with other people about their problems. E contact works as a mobile app and can be installed in android tablets.
Note:
 The complete source code and project report of android app project is available in the download link Here
Place where all sort of programming stuff and reviews,technology news are shared and Useful Project of C++,C,java C# etc
Android provides many kinds of storage for applications to store their data. Thes storage places are shared preferences , internal and external storage , SQLite storage , and storage via network connection.

In this chapter we are going to look at the internal storage. Internal storge is the storage of the private data on the device memory.

By default these files are private and are accessed by only your application and get deleted , when user delete your application.

Writing file

In order to use internal storage to write some data in the file, call the openFileOutput() method with the name of the file and the mode. The mode could be private , public e.t.c. Its syntax is given below:
FileOutputStream fOut = openFileOutput("file name here",MODE_WORLD_READABLE); 
The method openFileOutput() returns an instance of FileOutputStream. So you receive it in the object of FileInputStream. After that you can call write method to write data on the file. Its syntax is given below:


String str = "data";
fOut.write(str.getBytes());
fOut.close();

Reading file

In order to read from the file you just created , call the openFileInput() method with the name of the file. It returns an instance of FileInputStream. Its sytanx is given below:
FileInputStream fin = openFileInput(file);
After that, you can call read method to read one character at a time from the file and then you can print it. Its syntax is given below:

int c;
String temp="";
while( (c = fin.read()) != -1){
   temp = temp + Character.toString((char)c);
}
//string temp contains all the data of the file.
fin.close();
Apart from the the methods of write and close, there are other methods provided by the Fileoutputstream class for better writing files. These methods are listed below:


Sr.NoMethod & description
1FileOutputStream(File file, boolean append)
This method constructs a new FileOutputStream that writes to file.
2getChannel()
This method returns a write-only FileChannel that shares its position with this stream
3getFD()
This method returns the underlying file descriptor
4write(byte[] buffer, int byteOffset, int byteCount)
This method Writes count bytes from the byte array buffer starting at position offset to this stream
Apart from the the methods of read and close, there are other methods provided by the FileInputStreamclass for better reading files. These methods are listed below:


Sr.NoMethod & description
1available()
This method returns an estimated number of bytes that can be read or skipped without blocking for more input
2getChannel()
This method returns a read-only FileChannel that shares its position with this stream
3getFD()
This method returns the underlying file descriptor
4read(byte[] buffer, int byteOffset, int byteCount)
This method reads at most length bytes from this stream and stores them in the byte array b starting at offset
ExampleHere is an example demonstrating the use of internal storage to store and read files. It creates a basic storage application that allows you to read and write from internal storage.

To experiment with this example , you can run this on an actual device or in an emulator.

StepsDescription
1You will use Eclipse IDE to create an Android application and name it as Storage under a package com.example.storage. While creating this project, make sure you Target SDK and Compile With at the latest version of Android SDK to use higher levels of APIs.
2Modify src/MainActivity.java file to add necessary code.
3Modify the res/layout/activity_main to add respective XML components
4Modify the res/values/string.xml to add necessary string components
5Run the application and choose a running android device and install the application on it and verify the results

Following is the content of the modifed main activity file src/com.example.storage/MainActivity.java.
package com.example.storage;

import java.io.FileInputStream;
import java.io.FileOutputStream;
import java.io.InputStreamReader;

import android.app.Activity;
import android.os.Bundle;
import android.view.Menu;
import android.view.View;
import android.widget.EditText;
import android.widget.Toast;

public class MainActivity extends Activity {

   private EditText et;
   private String data;
   private String file = "mydata";
   @Override
   protected void onCreate(Bundle savedInstanceState) {
      super.onCreate(savedInstanceState);
      setContentView(R.layout.activity_main);
      et = (EditText)(findViewById(R.id.editText1));

   }

   public void save(View view){
      data = et.getText().toString();
      try {
         FileOutputStream fOut = openFileOutput(file,MODE_WORLD_READABLE);
         fOut.write(data.getBytes());
         fOut.close();
         Toast.makeText(getBaseContext(),"file saved",
         Toast.LENGTH_SHORT).show();
      } catch (Exception e) {
         // TODO Auto-generated catch block
         e.printStackTrace();
      }
   }
   public void read(View view){
      try{
         FileInputStream fin = openFileInput(file);
         int c;
         String temp="";
         while( (c = fin.read()) != -1){
            temp = temp + Character.toString((char)c);
         }
         et.setText(temp);
         Toast.makeText(getBaseContext(),"file read",
         Toast.LENGTH_SHORT).show();

      }catch(Exception e){

      }
   }
   @Override
   public boolean onCreateOptionsMenu(Menu menu) {
      // Inflate the menu; this adds items to the action bar if it is present.
      getMenuInflater().inflate(R.menu.main, menu);
      return true;
   }

}
Following is the modified content of the xml res/layout/activity_main.xml.
<RelativeLayout xmlns:android="http://schemas.android.com/apk/res/android"
   xmlns:tools="http://schemas.android.com/tools"
   android:layout_width="match_parent"
   android:layout_height="match_parent"
   android:paddingBottom="@dimen/activity_vertical_margin"
   android:paddingLeft="@dimen/activity_horizontal_margin"
   android:paddingRight="@dimen/activity_horizontal_margin"
   android:paddingTop="@dimen/activity_vertical_margin"
   tools:context=".MainActivity" >

   <Button
      android:id="@+id/button1"
      android:layout_width="wrap_content"
      android:layout_height="wrap_content"
      android:layout_alignParentTop="true"
      android:layout_centerHorizontal="true"
      android:layout_marginTop="182dp"
      android:onClick="save"
      android:text="@string/save" />

   <Button
      android:id="@+id/button2"
      android:layout_width="wrap_content"
      android:layout_height="wrap_content"
      android:layout_alignLeft="@+id/button1"
      android:layout_alignRight="@+id/button1"
      android:layout_below="@+id/button1"
      android:layout_marginTop="46dp"
      android:onClick="read"
      android:text="@string/read" />

   <EditText
      android:id="@+id/editText1"
      android:layout_width="wrap_content"
      android:layout_height="wrap_content"
      android:layout_alignLeft="@+id/button1"
      android:layout_alignParentTop="true"
      android:layout_marginTop="23dp"
      android:ems="10"
      android:inputType="textMultiLine" >

      <requestFocus />
   </EditText>

</RelativeLayout>
Following is the content of the res/values/string.xml.
<?xml version="1.0" encoding="utf-8"?>
<resources>

   <string name="app_name">Storage</string>
   <string name="action_settings">Settings</string>
   <string name="hello_world">Hello world!</string>
   <string name="save">save to intenal storage</string>
   <string name="read">load from intenal storag</string>
</resources>
Following is the content of AndroidManifest.xml file.
<?xml version="1.0" encoding="utf-8"?>
<manifest xmlns:android="http://schemas.android.com/apk/res/android"
   package="com.example.storage"
   android:versionCode="1"
   android:versionName="1.0" >

   <uses-sdk
      android:minSdkVersion="8"
      android:targetSdkVersion="17" />

   <application
      android:allowBackup="true"
      android:icon="@drawable/ic_launcher"
      android:label="@string/app_name"
      android:theme="@style/AppTheme" >
      <activity
         android:name="com.example.storage.MainActivity"
         android:label="@string/app_name" >
         <intent-filter>
            <action android:name="android.intent.action.MAIN" />

            <category android:name="android.intent.category.LAUNCHER" />
         </intent-filter>
      </activity>
   </application>

</manifest>
Let's try to run our Storage application we just modified. I assume you had created your AVD while doing environment setup. To run the app from Eclipse, open one of your project's activity files and click Run icon from the toolbar. Eclipse installs the app on your AVD and starts it and if everything is fine with your setup and application, it will display following Emulator window:

Android Internal Stroage Tutorial
Now what you need to do is to enter any text in the field. For example , i have entered soem text. Press the save button. The following notification would appear in you AVD:

Android Internal Stroage Tutorial
Now when you press the load button, the application will read the file , and display the data. In case of our, following data would be returned:

Android Internal Stroage Tutorial


Note you can actually view this file by switching to DDMS tab. In DDMS , select file explorer and navigate this path.
data>data>com.example.storage>files>mydata
This has also been shown in the image below.

Android Internal Stroage Tutorial

Place where all sort of programming stuff and reviews,technology news are shared and Useful Project of C++,C,java C# etc
JSON stands for JavaScript Object Notation.It is an independent data exchange format and is the best alternative for XML. This chapter explains how to parse the JSON file and extract necessary information from it.

Android provides four differnet classes to manipulate JSON data. These classes areJSONArray,JSONObject,JSONStringer and JSONTokenizer.

The first step is to identify the fields in the JSON data in which you are interested in. For example. In the JSON given below we interested in getting temperature only.


{
"sys":
   {
      "country":"GB",
      "sunrise":1381107633,
      "sunset":1381149604
   },
"weather":[
   {
      "id":711,
      "main":"Smoke",
      "description":"smoke",
      "icon":"50n"
   }
],
"main":
   {
      "temp":304.15,
      "pressure":1009,
   }
}

JSON - Elements

An JSON file consist of many components. Here is the table defining the compoents of an JSON file and their description:

Sr.NoComponent & description
1Array([)
In a JSON file , square bracket ([) represents a JSON array
2Objects({)
In a JSON file, curly bracket ({) represents a JSON object
3Key
A JSON object contains a key that is just a string. Pairs of key/value make up a JSON object
4Value
Each key has a value that could be string , integer or double e.t.c

JSON - Parsing

For parsing a JSON object, we will create an object of class JSONObject and specify a string containing JSON data to it. Its syntax is:
String in;
JSONObject reader = new JSONObject(in);

The last step is to parse the JSON. An JSON file consist of different object with different key/value pair e.t.c. So JSONObject has a separate function for parsing each of the component of JSON file. Its syntax is given below:

JSONObject sys  = reader.getJSONObject("sys");
country = sys.getString("country");
   
JSONObject main  = reader.getJSONObject("main");
temperature = main.getString("temp");


The method getJSONObject returns the JSON object. The method getString returns the string value of the specified key.

Apart from the these methods , there are other methods provided by this class for better parsing JSON files. These methods are listed below:

Sr.NoMethod & description
1get(String name)
This method just Returns the value but in the form of Object type
2getBoolean(String name)
This method returns the boolean value specified by the key
3getDouble(String name)
This method returns the double value specified by the key
4getInt(String name)
This method returns the integer value specified by the key
5getLong(String name)
This method returns the long value specified by the key
6length()
This method returns the number of name/value mappings in this object..
7names()
This method returns an array containing the string names in this object.
Example

Here is an example demonstrating the use of JSONObject class. It creates a basic Weather application that allows you to parse JSON from google weather api and show the result.

To experiment with this example , you can run this on an actual device or in an emulator.

StepsDescription
1You will use Eclipse IDE to create an Android application and name it as JSONParser under a package com.example.jsonparser. While creating this project, make sure you Target SDK and Compile With at the latest version of Android SDK to use higher levels of APIs.
2Modify src/MainActivity.java file to add necessary code.
3Modify the res/layout/activity_main to add respective XML components
4Modify the res/values/string.xml to add necessary string components
5Create a new java file under src/HandleJSON.java to fetch and parse XML data
6Modify AndroidManifest.xml to add necessary internet permission
7Run the application and choose a running android device and install the application on it and verify the results
Following is the content of the modifed main activity filesrc/com.example.jsonparser/MainActivity.java.
package com.example.jsonparser;

import android.os.Bundle;
import android.app.Activity;
import android.view.Menu;
import android.view.View;
import android.widget.EditText;

public class MainActivity extends Activity {

   private String url1 = "http://api.openweathermap.org/data/2.5/weather?q=";
   private EditText location,country,temperature,humidity,pressure;
   private HandleJSON obj;
   @Override
   protected void onCreate(Bundle savedInstanceState) {
      super.onCreate(savedInstanceState);
      setContentView(R.layout.activity_main);
      location = (EditText)findViewById(R.id.editText1);
      country = (EditText)findViewById(R.id.editText2);
      temperature = (EditText)findViewById(R.id.editText3);
      humidity = (EditText)findViewById(R.id.editText4);
      pressure = (EditText)findViewById(R.id.editText5);
   }

   @Override
   public boolean onCreateOptionsMenu(Menu menu) {
      // Inflate the menu; this adds items 
      //to the action bar if it is present.
      getMenuInflater().inflate(R.menu.main, menu);
      return true;
   }

   public void open(View view){
      String url = location.getText().toString();
      String finalUrl = url1 + url;
      country.setText(finalUrl);
      obj = new HandleJSON(finalUrl);
      obj.fetchJSON();

      while(obj.parsingComplete);
      country.setText(obj.getCountry());
      temperature.setText(obj.getTemperature());
      humidity.setText(obj.getHumidity());
      pressure.setText(obj.getPressure());

   }
}
Following is the content of src/com.example.jsonparser/HandleXML.java.
package com.example.jsonparser;

import java.io.IOException;
import java.io.InputStream;
import java.io.InputStreamReader;
import java.io.StringWriter;
import java.io.UnsupportedEncodingException;
import java.net.HttpURLConnection;
import java.net.URL;
import java.util.ArrayList;
import java.util.List;
import java.util.Map;

import org.json.JSONObject;
import org.xmlpull.v1.XmlPullParser;
import org.xmlpull.v1.XmlPullParserFactory;

import android.annotation.SuppressLint;

public class HandleJSON {
   private String country = "county";
   private String temperature = "temperature";
   private String humidity = "humidity";
   private String pressure = "pressure";
   private String urlString = null;

   public volatile boolean parsingComplete = true;
   public HandleJSON(String url){
      this.urlString = url;
   }
   public String getCountry(){
      return country;
   }
   public String getTemperature(){
      return temperature;
   }
   public String getHumidity(){
      return humidity;
   }
   public String getPressure(){
      return pressure;
   }

   @SuppressLint("NewApi")
   public void readAndParseJSON(String in) {
      try {
         JSONObject reader = new JSONObject(in);

         JSONObject sys  = reader.getJSONObject("sys");
         country = sys.getString("country");

         JSONObject main  = reader.getJSONObject("main");
         temperature = main.getString("temp");

         pressure = main.getString("pressure");
         humidity = main.getString("humidity");

         parsingComplete = false;


        } catch (Exception e) {
           // TODO Auto-generated catch block
           e.printStackTrace();
        }

   }
   public void fetchJSON(){
      Thread thread = new Thread(new Runnable(){
         @Override
         public void run() {
         try {
            URL url = new URL(urlString);
            HttpURLConnection conn = (HttpURLConnection) url.openConnection();
            conn.setReadTimeout(10000 /* milliseconds */);
            conn.setConnectTimeout(15000 /* milliseconds */);
            conn.setRequestMethod("GET");
            conn.setDoInput(true);
            // Starts the query
            conn.connect();
         InputStream stream = conn.getInputStream();

      String data = convertStreamToString(stream);

      readAndParseJSON(data);
         stream.close();

         } catch (Exception e) {
            e.printStackTrace();
         }
         }
      });

       thread.start();   
   }
   static String convertStreamToString(java.io.InputStream is) {
      java.util.Scanner s = new java.util.Scanner(is).useDelimiter("\\A");
      return s.hasNext() ? s.next() : "";
   }
}
Following is the modified content of the xml res/layout/activity_main.xml.
<RelativeLayout xmlns:android="http://schemas.android.com/apk/res/android"
   xmlns:tools="http://schemas.android.com/tools"
   android:layout_width="match_parent"
   android:layout_height="match_parent"
   android:paddingBottom="@dimen/activity_vertical_margin"
   android:paddingLeft="@dimen/activity_horizontal_margin"
   android:paddingRight="@dimen/activity_horizontal_margin"
   android:paddingTop="@dimen/activity_vertical_margin"
   tools:context=".MainActivity" >

   <TextView
      android:id="@+id/textView1"
      android:layout_width="wrap_content"
      android:layout_height="wrap_content"
      android:layout_alignParentLeft="true"
      android:layout_alignParentTop="true"
      android:layout_marginTop="15dp"
      android:text="@string/location"
      android:textAppearance="?android:attr/textAppearanceMedium" />

   <EditText
      android:id="@+id/editText1"
      android:layout_width="wrap_content"
      android:layout_height="wrap_content"
      android:layout_alignBottom="@+id/textView1"
      android:layout_alignParentRight="true"
      android:ems="10" />

   <TextView
      android:id="@+id/textView2"
      android:layout_width="wrap_content"
      android:layout_height="wrap_content"
      android:layout_alignLeft="@+id/textView1"
      android:layout_below="@+id/textView1"
      android:layout_marginTop="68dp"
      android:text="@string/country"
      android:textAppearance="?android:attr/textAppearanceSmall" />

   <TextView
      android:id="@+id/textView3"
      android:layout_width="wrap_content"
      android:layout_height="wrap_content"
      android:layout_below="@+id/textView2"
      android:layout_marginTop="19dp"
      android:text="@string/temperature"
      android:textAppearance="?android:attr/textAppearanceSmall" />

   <TextView
      android:id="@+id/textView4"
      android:layout_width="wrap_content"
      android:layout_height="wrap_content"
      android:layout_alignLeft="@+id/textView3"
      android:layout_below="@+id/textView3"
      android:layout_marginTop="32dp"
      android:text="@string/humidity"
      android:textAppearance="?android:attr/textAppearanceSmall" />

   <TextView
      android:id="@+id/textView5"
      android:layout_width="wrap_content"
      android:layout_height="wrap_content"
      android:layout_alignLeft="@+id/textView4"
      android:layout_below="@+id/textView4"
      android:layout_marginTop="21dp"
      android:text="@string/pressure"
      android:textAppearance="?android:attr/textAppearanceSmall" />

   <EditText
      android:id="@+id/editText2"
      android:layout_width="wrap_content"
      android:layout_height="wrap_content"
      android:layout_above="@+id/textView3"
      android:layout_toRightOf="@+id/textView3"
      android:ems="10" >

      <requestFocus />
   </EditText>

   <EditText
      android:id="@+id/editText3"
      android:layout_width="wrap_content"
      android:layout_height="wrap_content"
      android:layout_alignBaseline="@+id/textView3"
      android:layout_alignBottom="@+id/textView3"
      android:layout_alignLeft="@+id/editText2"
      android:ems="10" />

   <EditText
      android:id="@+id/editText4"
      android:layout_width="wrap_content"
      android:layout_height="wrap_content"
      android:layout_above="@+id/textView5"
      android:layout_alignLeft="@+id/editText1"
      android:ems="10" />

   <EditText
      android:id="@+id/editText5"
      android:layout_width="wrap_content"
      android:layout_height="wrap_content"
      android:layout_alignBaseline="@+id/textView5"
      android:layout_alignBottom="@+id/textView5"
      android:layout_alignRight="@+id/editText4"
      android:ems="10" />

   <Button
      android:id="@+id/button1"
      android:layout_width="wrap_content"
      android:layout_height="wrap_content"
      android:layout_alignLeft="@+id/editText2"
      android:layout_below="@+id/editText1"
      android:onClick="open"
      android:text="@string/weather" />

</RelativeLayout>
Following is the content of the res/values/string.xml.
<?xml version="1.0" encoding="utf-8"?>
<resources>
   <string name="app_name">JSONParser</string>
   <string name="action_settings">Settings</string>
   <string name="hello_world">Hello world!</string>
   <string name="location">Location</string>
   <string name="country">Country:</string>
   <string name="temperature">Temperature:</string>
   <string name="humidity">Humidity:</string>
   <string name="pressure">Pressure:</string>
   <string name="weather">Weather</string>
</resources>
Following is the content of AndroidManifest.xml file.

<?xml version="1.0" encoding="utf-8"?>
<manifest xmlns:android="http://schemas.android.com/apk/res/android"
   package="com.example.jsonparser"
   android:versionCode="1"
   android:versionName="1.0" >

   <uses-sdk
      android:minSdkVersion="8"
      android:targetSdkVersion="17" />
   <uses-permission android:name="android.permission.INTERNET"/>

   <application
      android:allowBackup="true"
      android:icon="@drawable/ic_launcher"
      android:label="@string/app_name"
      android:theme="@style/AppTheme" >
   <activity
      android:name="com.example.jsonparser.MainActivity"
      android:label="@string/app_name" >
      <intent-filter>
         <action android:name="android.intent.action.MAIN" />

         <category android:name="android.intent.category.LAUNCHER" />
      </intent-filter>
   </activity>
</application>
</manifest>
Let's try to run our JSONParser application we just modified. I assume you had created your AVD while doing environment setup. To run the app from Eclipse, open one of your project's activity files and click Run . icon from the toolbar. Eclipse installs the app on your AVD and starts it and if everything is fine with your setup and application, it will display following Emulator window:

Anroid XML Parser Tutorial
Now what you need to do is to enter any location in the location field. For example , i have entered newyork. Press the weather button , when you enter the location. The following screen would appear in you AVD:

Anroid XML Parser Tutorial

Now when you press the weather button, the application will contact the Google Weather API and will request for your necessary JSON location file and will parse it. In case of newyork following file would be returned:

London Temperature from google weather api

Note that this temperature is in kelvin, so if you want to convert it into more understandble format , you have to convert it into Celcius.